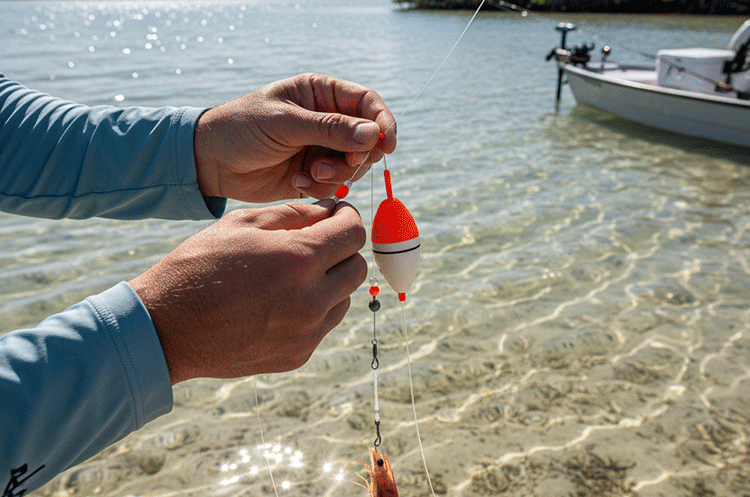
How to Rig a Slip Float for Inshore Fishing
The slip float rig is one of the most effective and versatile setups for inshore saltwater fishing. Unlike a fixed float (or popping cork), the slip float allows you to fish your bait at virtually any depth without casting issues, making it ideal for targeting fish suspended in the water column or holding near bottom structure like oyster beds or pilings. This step-by-step guide will walk you through creating the perfect slip float rig for species like Redfish, Speckled Trout, and Snook.
Materials You Will Need
- Fishing Rod and Reel: A medium-light to medium action spinning combo spooled with 10-20 lb braid is standard.
- Slip Float: Choose a streamlined, high-visibility float that is rated to carry your weight (typically 1/4 oz to 1 oz).
- Stop Knot Material (or Store-Bought Stop): Small-diameter twine or specialty stop-knot thread is best.
- Bead: A small plastic or glass bead with a hole slightly larger than your main line.
- Weight: Egg sinker, split shot, or a small lead weight (e.g., 1/8 oz to 1/2 oz) appropriate for the float.
- Swivel: A small barrel swivel to connect your main line to your leader.
- Leader Line: 15-30 lb fluorocarbon leader is recommended for abrasion resistance and low visibility.
- Hook: J-hook, circle hook, or a small jig head, depending on your bait.
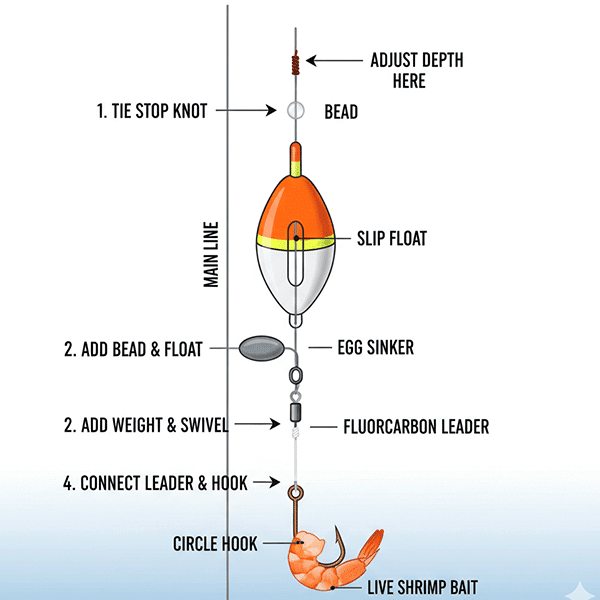
Step-by-Step Rigging Instructions
Step 1: Tie the Stop Knot
The stop knot is the most crucial part of this rig, as it controls the depth of your bait. It must be small enough to pass through your rod guides easily but large enough to stop the bead.
- Thread your main line through the center of the stop knot material loop.
- Wrap the stop knot material around your main line 5 to 7 times.
- Pull both ends of the stop knot material to cinch down the knot firmly, ensuring it is snug but not so tight that it damages the main line.
- Trim the tags, leaving about 1/4 inch on each side to allow for re-tightening after repeated casts.
Tip: You can purchase pre-made bobber stops, which are convenient and easy to slide onto the line.
Step 2: Add the Bead and Float
The bead prevents the stop knot from slipping through the float’s eyelet. Slide the following onto your main line in this order:
- The plastic or glass bead.
- The slip float (make sure the line passes freely through the float).
Step 3: Attach the Weight and Swivel
The weight helps the line slide down through the float and keeps your bait in the strike zone. The swivel prevents line twist and makes connecting the leader simple.
- Slide your egg sinker or weight onto the main line below the float.
- Tie your barrel swivel to the end of your main line using a reliable knot like a Palomar or Uni knot.
Step 4: Connect the Leader and Hook
Your leader should be 18 to 36 inches long, depending on water clarity and target species.
- Tie one end of the fluorocarbon leader to the open end of the barrel swivel.
- Tie your desired hook or jig head to the other end of the leader.
How to Set the Depth
The beauty of the slip float rig is the ability to instantly adjust the depth. To set the depth, simply slide the stop knot up or down the main line. Slide it up to fish deeper and down to fish shallower. A good starting point is to set the depth so your bait sits just above the bottom or structure you are fishing near.
Mastering this versatile rig opens up new opportunities for inshore fishing, allowing you to present live or cut bait with precision and finesse in various water conditions and depths.
![]()
Topsail Fish | Topsail Island Fishing Guides | Topsail Island Fishing Captains | Topsail Island Fishing Charters | NC Wildlife Resources Commission
Keep Building Your Topsail Fishing Skills
Want to put this technique to work on your next trip? Use these Topsail.Fish resources to check current fishing activity, match your tactics to the season, review local conditions, and find more step-by-step fishing guides.
🎣 Planning a fishing trip to coastal North Carolina? Before choosing a charter destination, discover why many anglers prefer Topsail Island’s less crowded waters, productive back bays, and outstanding inshore and surf fishing opportunities.
🎣 Planning a trip to the NC coast? Before you book a boat down south, check out why Topsail vs. Wilmington fishing offers a better backwater experience. 🎣

Are you a Topsail Area Captain?
Grow your charter business with an SEO-optimized listing in our directory. For just $12/month, we help you reach more anglers and secure the consistent bookings you need to thrive.


